Gateway Specific 3DS2 Integration Guide for Mobile Webview
For users ready to integrate with our Spreedly 3DS2 Global mobile solution, see our Spreedly 3DS2 Global mobile webview guide instead.
3D Secure is the name for a protocol established by Visa and MasterCard that adds two-factor authentication to credit card transactions on those networks. While avoided by merchants whenever possible (since it adds a huge barrier to customers completing a transaction), and basically unused in the US, it is sometimes a requirement for some non-US based merchants.
Two things are important to keep in mind about the 3D Secure flow on Spreedly:
- 3D Secure is completely optional, even for gateways that support it. You must flag transactions (details below) in order for Spreedly to even attempt 3D secure on them. Similarly, even if a transaction is flagged, it will be processed regardless if run on a gateway that doesn’t support 3D Secure.
- You must support our asynchronous transaction flow (also used for Offsite Payments, details below) in order for it to work. It’s as similar as possible to the normal workflow, but you can’t just “flip a switch” and have it start working.
To prepare your mobile payment application for the Payment Services Directive and 3DS2 Requirements with Spreedly, you will need to implement and test each of the flows outlined below. Integrating with the Spreedly Test gateway will prepare your application for future integration with 3DS2 supported production gateways in the coming weeks.If you have questions not addressed in the integration guide, please contact Spreedly support for assistance.
For general PSD2 Compliance information, please visit our PSD2 Compliance Guide.
If you have already implemented 3DS2 with Spreedly using the Spreedly 3DS2 Gateway Specific Guide you will likely recognize many of these steps. However, it is important to note that this is a separate integration requiring the code blocks below to be integrated into your native mobile application and rendered in a webview and as such, all events from the lifecycle object should post messages to your native application.
Why mobile Webview:
We are focusing development on our Spreedly 3DS2 Global solution, which will provide SDK support. This web-based mobile solution serves as an alternative for those who do not wish to use our SDK or have not yet transitioned away from our Gateway Specific 3DS2 solution.
What you’ll need:
- A strong working knowledge of mobile development
- A native mobile application to test out the webview approach
- A web application where you can host HTML files on your companies domain. All HTML templates below are recommended to be hosted on your domain.
Integration Guide for Web
Please use the test data below to initiate and simulate 3DS2 flows
Test Data for Spreedly 3DS2 Gateway Specific
Credit Cards
| Card Number | CVV | Expiration | Type |
|---|---|---|---|
| 4556761029983886 | 123 | 10/2029 | Valid 3D Secure Enrolled Card |
| 4024007101934890 | 123 | 10/2029 | Invalid 3D Secure Enrolled Card |
$ Amounts
| Amount in cents | Result | Requires Lifecycle | Requires Completion Endpoint |
|---|---|---|---|
| 3001 | 3D Secure 2 full frictionless flow (immediate transaction flow) | ||
| 3003 | 3D Secure device fingerprint flow with direct authorize | Yes | Yes |
| 3004 | 3D Secure device fingerprint flow to challenge | Yes | Yes |
| 3005 | 3D Secure direct challenge | Yes | |
| 3103 | 3D Secure device fingerprint flow with forced failure | Yes | Yes |
| 3104 | 3D Secure challenge flow with forced failure | Yes |
Note: Amounts are important to simulate flows properly. If you try other amounts, you may experience unexpected behavior.
Integration steps
Prerequisites
You will need a Spreedly Test gateway token to interact with the simulated 3DS2 flows. If you already have a Spreedly Test gateway setup you are likely good to go. If you don’t have a Spreedly Test gateway setup or want to spin up a new one for 3DS2 testing, follow the guide here.
Verify your test gateway can successfully make a purchase without 3DS. This will help limit future troubleshooting to 3DS specific changes.
Generate or use an existing payment method token - follow the instructions at Spreedly API docs
Load Spreedly iFrame javascript in a webview
Include Spreedly iFrame javascript on your checkout page
 <head>
   <script src="https://core.spreedly.com/iframe/iframe-v1.min.js"></script>
 </head>
or load Spreedly Express javascript in a webview
 <head>
   <script src="https://core.spreedly.com/iframe/express-3.min.js"></script>
 </head>
Set up your backend
Using the payment method token, make an authorize or purchase request - follow instructions from Spreedly API docs.
Be sure to include the following in your request, all are required:
attempt_3dsecure: truecallback_urlandredirect_urlthree_ds_version: "2"browser_infowhich is collected as follows:
// Choose a browser size for your application. This will be the size of the challenge
// iframe that will be presented to a user. *note* If you're creating a modal, you
// should make the surrounding DOM node a little larger than the option selected
// below.
//
// '01' - 250px x 400px
// '02' - 390px x 300px
// '03' - 500px x 600px
// '04' - 600px x 400px
// '05' - fullscreen
<!doctype html>

<html lang="en">
  <head>
    <!-- load spreedly iframe -->
    <script src="https://core.spreedly.com/iframe/iframe-v1.min.js"></script>
  </head>

  <body>
  <script type="text/javascript">
    (function() {
      var challengeWindowSize = "05";
      var browserInfo = Spreedly.ThreeDS.serialize(challengeWindowSize);
      // Post a message to your native application. postMessageToNativeApp is an
      // example function. Depending on platform IOS, Android, etc you'll need to
      // replace it with a platform specific call.
      postMessageToNativeApp(browserInfo);
    })();
  </script>
  </body>
</html>
and in your native mobile code you’ll accept the message posted with browser info and then make your purchase request
An example request to your backend will look like:
  fetch('https://your-backend.test/purchase.json', {
    method: 'POST',
    body: JSON.stringify({
      ...normalPurchaseParams,
      browser_info: browser_info,
      attempt_3dsecure: true,
      three_ds_version: "2"
    })
  });
This is an example request to your backend that you’ll need to issue an authenticated purchase request to Spreedly. normalPurchaseParams will be the standard params that you pass to your backend and then on to Spreedly. They were omitted to expose what is new and required for 3DS2 requests.
Note: Parameters such as browser_info and attempt_3dsecure must match casing and underscore. browserInfo will not work.
Now, you should create an authorize or purchase request to the Spreedly API. All of the following transaction fields are required.
  POST /v1/gateways/<gateway_token>/purchase.json HTTPS/1.1
  Host: core.spreedly.com
  Authorization: Basic QWxhZGRpbjpvcGVuIHNlc2FtZQ==
  Content-Type: application/<format>


  {
    "transaction": {
      "payment_method_token": "<payment_method_token>",
      "amount": 3001,
      "currency_code": "USD",
      "redirect_url": "<redirect_url>",
      "callback_url": "<callback_url>",
      "three_ds_version": "2",
      "attempt_3dsecure": true,
      "browser_info": "<value from Spreedly.ThreeDS.serialize()>"
    }
  }
The authorize/purchase request above will return a transaction object containing a token field. Make note of this transaction.token field as you will need it for the next step: this is the transactionToken
Transition your customer to a loading screen for the attempted transaction. This screen will hold another webview that completes the 3DS transaction. This page should load Spreedly iframe.js or express.js, create a new Spreedly.ThreeDS.Lifecycle object. When the Lifecycle object is created, you will then post a message from the object to your native mobile application. The lifecycle object is designed to handle the following:
If the transaction is in an error state, handle the error and display feedback to your user. Transactions that have failed cannot be updated or used to challenge the cardholder again; if you would like to present a cardholder with a new challenge upon failure, a new transaction should be used.
If the transaction is in a success state, you’re done - complete the purchase
If the transaction is in a pending state, handle the following asynchronous flow: Define/set, a)
Lifecycleobject to facilitate front end updating, b)Lifecyclecallbacks to handle asynchronous states, c) start 3DSecure asynchronous flowa. Define an instance of Spreedly.ThreeDS.Lifecycle with the location for hidden iframes and payment method token
  var lifecycle = new Spreedly.ThreeDS.Lifecycle({
    environmentKey: '...',
    // The environmentKey field is required, but if omitted, you will receive a console warning message and the transaction will still succeed.
    hiddenIframeLocation: 'device-fingerprint', (required)
    // The DOM node that you'd like to inject hidden iframes
    challengeIframeLocation: 'challenge', (required)
    // The DOM node that you'd like to inject the challenge flow
    transactionToken: '...', (required)
    // The token for the transaction - used to poll for state
    challengeIframeClasses: '...', (optional)
    // The css classes that you'd like to apply to the challenge iframe.
    //
    // Note: This is where you'll change the height and width of the challenge
    //       iframe. You'll need to match the height and width option that you
    //       selected when collecting browser data with `Spreedly.ThreeDS.serialize`.
    //       For instance if you selected '04' for browserSize you'll need to have a
    //       CSS class that has width and height of 600px by 400px.
  })
b. Define and set
lifecyclecallbacks/function for event handling called:statusUpdates//Define: var statusUpdates = function(event) { if (event.action === 'succeeded') { // post message to mobile app that the transaction was successful and finish your checkout } else if (event.action === 'error') { // present an error to the user to retry } else if (event.action === 'challenge') { // Show your modal containing the div provided in `challengeIframeLocation` when // creating the lifecycle event. // // Example HTML on your page: // // <head> // <style> // .hidden { // display: none; // } // // #challenge-modal { // <!-- style your modal here --> // } // </style> // </head> // <body> // <div id="device-fingerprint" class="hidden"> // <!-- Spreedly injects content into this div, // do not nest the challenge div inside of it --> // </div> // <div id="challenge-modal" class="hidden"> // <div id="challenge"> // </div> // </div> // </body> // // Example lifecycle object from step 3: // // var lifecycle = new Spreedly.ThreeDS.Lifecycle({ // hiddenIframeLocation: 'device-fingerprint', // challengeIframeLocation: 'challenge', // ... // }) // // and then we show the challenge-modal // document.getElementById('challenge-modal').classList.remove('hidden'); } else if (event.action === 'trigger-completion') { // 1. make a request to your backend to do an authenticated call to Spreedly to complete the request // The completion call is `https://core.spreedly.com/v1/transactions/[transaction-token]/complete.json (or .xml)` // 2a. if the transaction is marked as "succeeded" finish your checkout and redirect to success page // 2b. if the transaction is marked "pending" you'll need to call finalize `event.finalize(transaction)` with the transaction data from the authenticated completion call. // This is an example of the authenticated call that you'd make // to your service. fetch(`https://your-service/complete/${purchaseToken}.json`, { method: 'POST' }) .then(response => response.json()) .then((data) => { if (data.state === 'succeeded') { // post message to mobile app that the transaction was successful and finish your checkout } if (data.state === 'pending') { event.finalize(data); } }) } } ... //Set: Spreedly.on('3ds:status', statusUpdates)The key event types to handle are
succeeded,error,challenge, andtrigger-completion.succeeded: occurs when the transaction has finished and it’s time to move your user away from your checkout page.error: occurs when there was an error with the transaction and you should either present an error to the user or cancel the transaction.challenge: occurs when it’s time to pop open the challenge flow. It’s recommended that you put thechallengeIframeLocationinside of another containing DIV that is hidden and show it at this time.trigger-completion: occurs when you should make the authenticated transaction completion call from your backend to Spreedly. This event will be fired when the transaction status was updated due to a callback in the cardholder’s iFrame or when 10 seconds have elapsed. When this event is received, it is necessary to callcompleteso that the latest transaction state can be retrieved in case of a timeout. After making acompletecall, the frontend should make anevent.finalize(data)with the response data from the api request if the transaction state returned is pending.finalization-timeout: occurs 10-15 minutes after presenting a challenge without the transaction state changing. It is recommended that merchants attempt a manual completion here to attempt to continue or finalize the transaction.Note: Worldpay uses postMessages to notify when authentication needs to progress to the next step. We pass these parameters in
event.context.{"MessageType": "profile.completed", "SessionId": "d3197c02-6f63-4ab2-801c-83633d097e32","Status": true)These parameters should be included in the complete call using the key
context.{context: {"MessageType": "profile.completed", "SessionId": "d3197c02-6f63-4ab2-801c-83633d097e32", "Status": true}}These parameters will only be sent during
trigger-completioneventsstatusUpdatesis the function that we defined in step 3.b, it’s intended to handle all event updates that occur through the 3DS lifecycle.c. Start 3DSecure asynchronous flow Once it is completely setup using the above steps, the
lifecycleprocess can be started using:lifecycle.start()Note: If you plan to run multiple 3DS2 authentications without a full page reload or redirect:
- The
Spreedly.on('3ds:status', statusUpdates)function should only be invoked once. Invoking it multiple times will register the event handlers multiple times leading to duplicate events being received. - Make sure to call
lifecycle.start()as soon as possible after receiving apendingstatus for a given transaction, as there is a 30 second timeout between the authentication response and challenge load specified as part of the 3DS V2 spec, see EMVco Spec 2.2.0, 5.5
- The
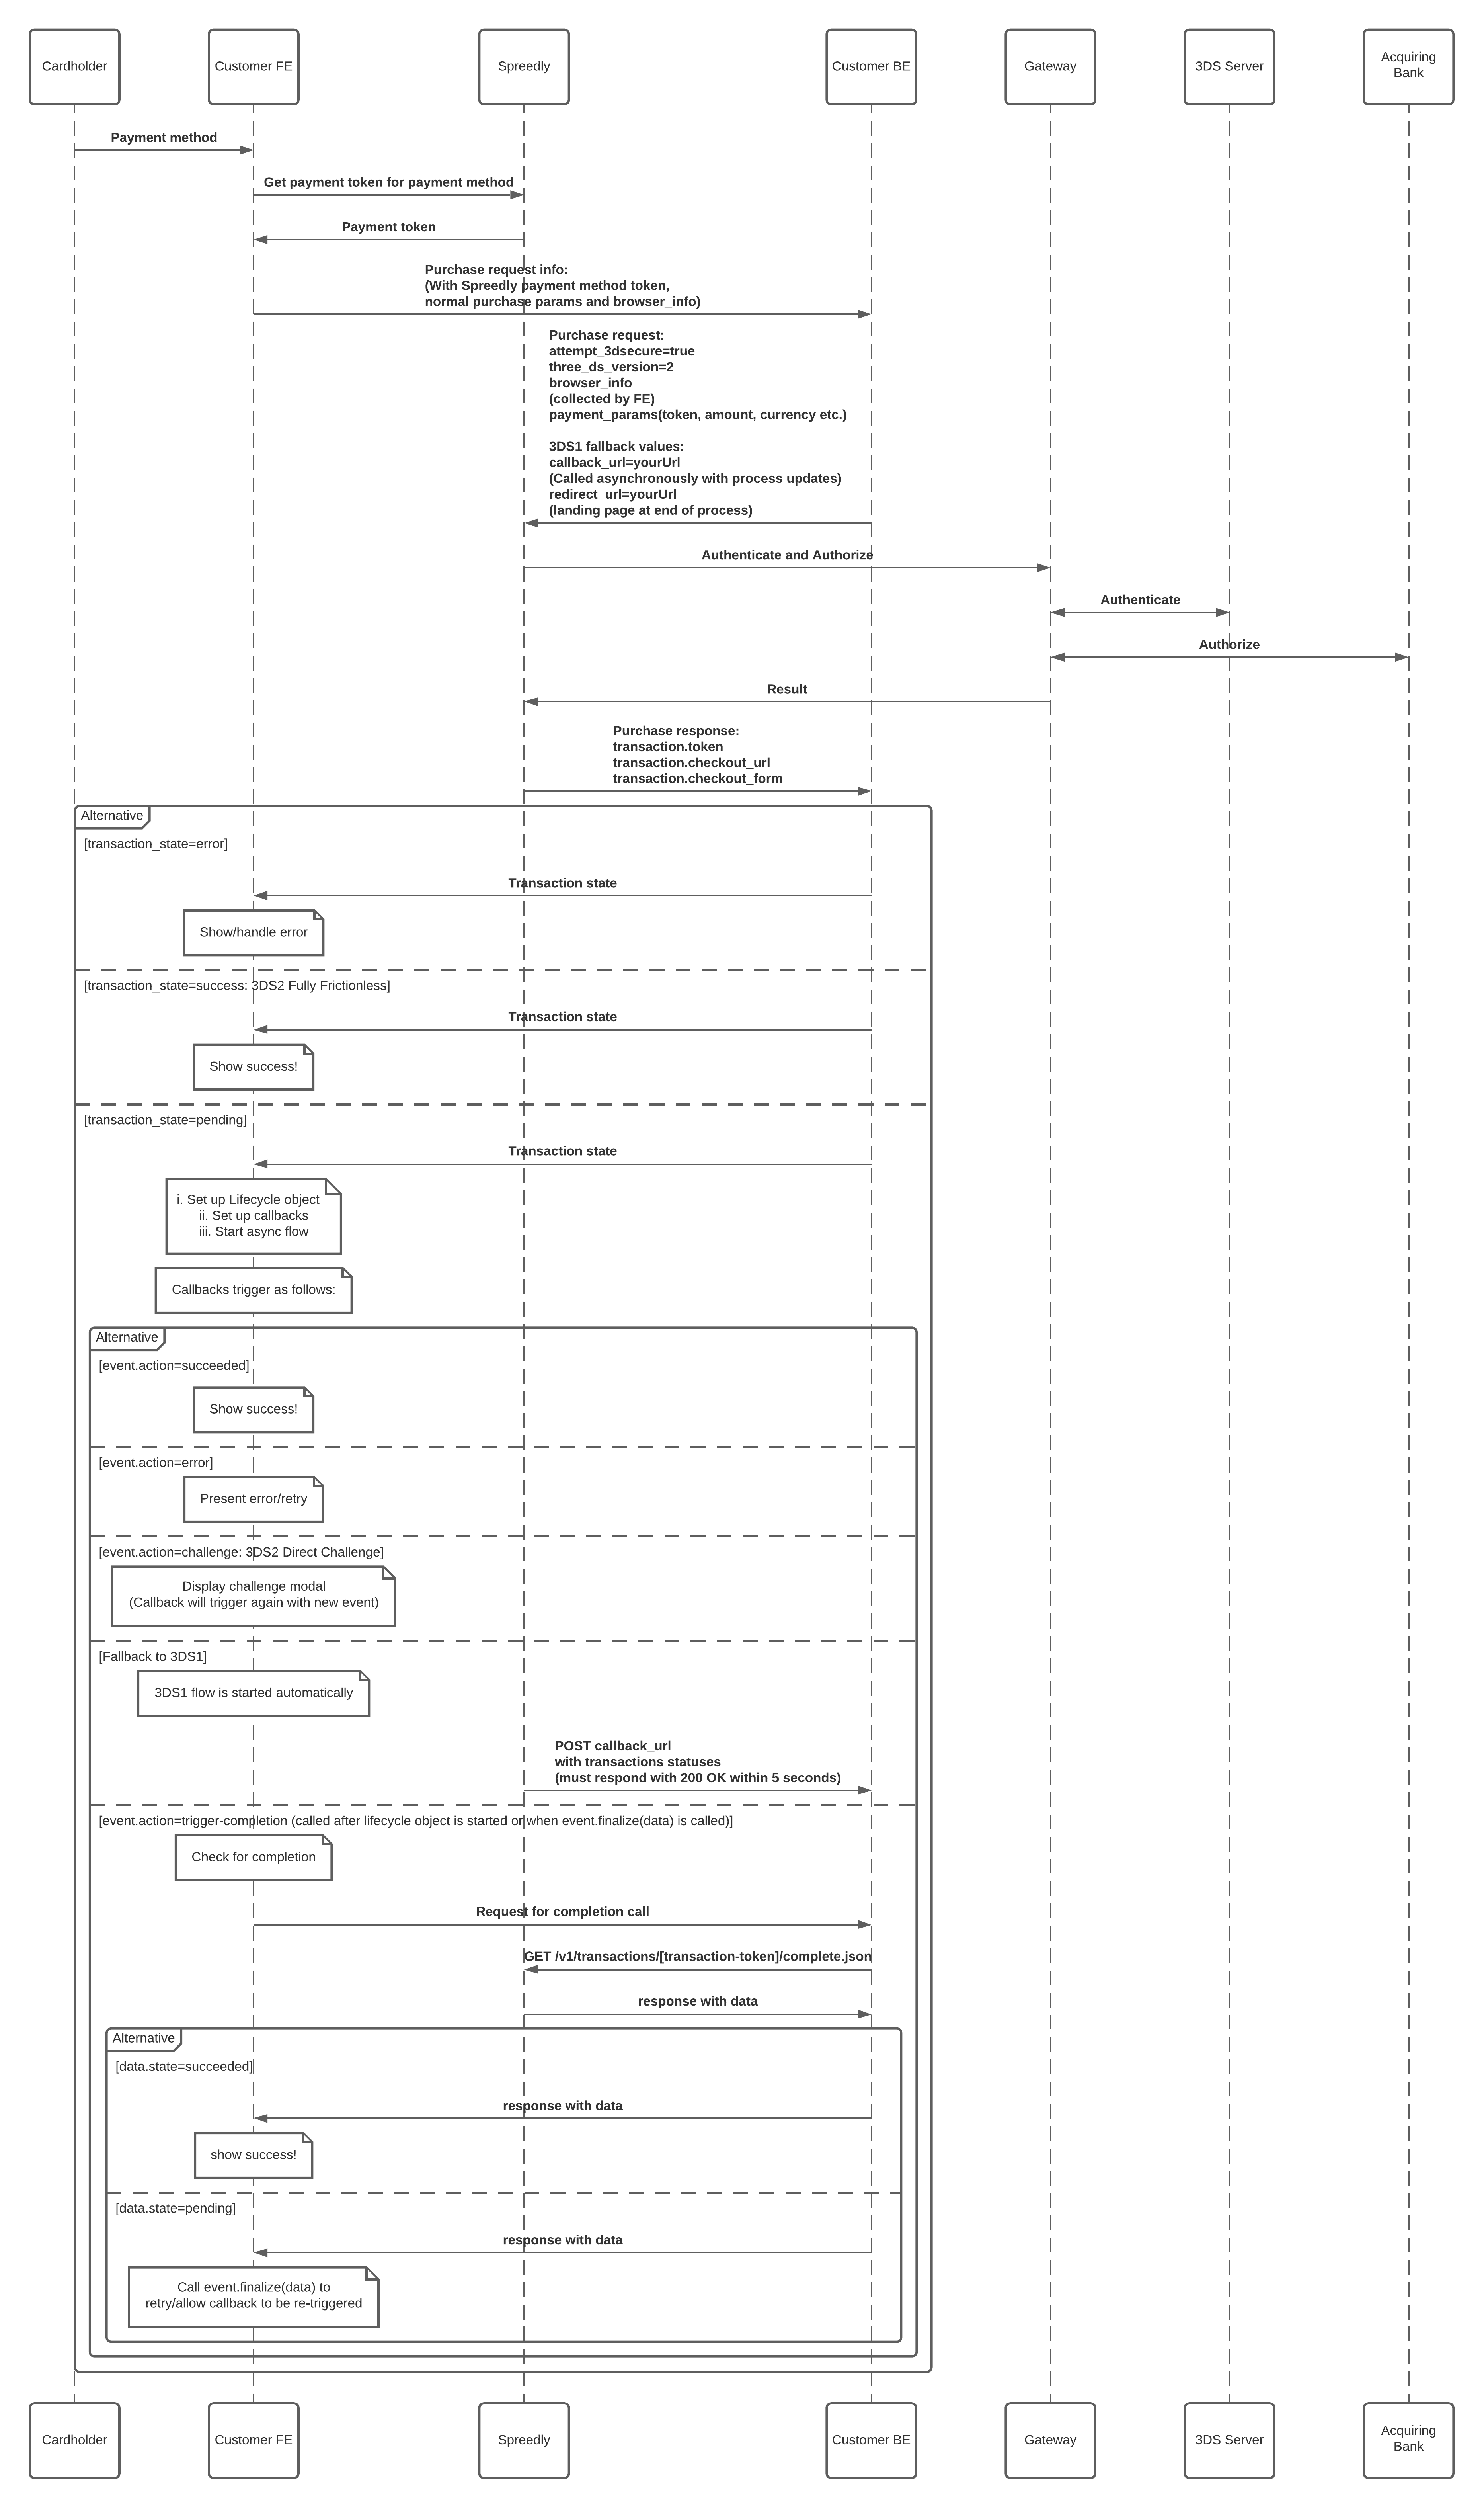
End to end flow diagram
Gateway Specific 3DS2 Flow Descriptions
The 3DS2 specification introduces new transaction flows to help verify the validity of a customer with as little interruption as possible, detailed below:
3DS2 Fully Frictionless
This flow represents the smoothest path through to transaction success. During the authorize or purchase flow the transaction, along with collected browser data, is deemed enough to verify the purchaser. No further action is required.
3DS2 Direct Challenge
This occurs when a transaction is deemed risky. The customer will be presented with an authentication form from the issuing bank, rendered in an iFrame, typically a modal.
3DS2 Device Fingerprint with Direct Authorize
If the initial transaction and collected browser data require more context, the fingerprint flow with direct authorize is attempted. A hidden iFrame is injected into the merchant’s page (at a specified location) and is submitted to the issuer in the background. Then, the client library will poll for up to 10 seconds, but responses are typically faster.
Note: The Spreedly test gateway will always take 10 seconds as it is a simulated gateway to assist in preparing for 3D Secure 2.
3DS2 Device Fingerprint to Challenge
This occurs when the initial transaction and browser data is collected, the hidden iFrame is injected and polled, and further information is required. The 3DS2 authentication form is rendered on the merchant’s site in an iFrame, typically in a modal.
3DS2 Denied
If Authentication fails, is rejected or denied, the transaction will be marked as failed and it is up to the merchant to retry the transaction or deny it.
3DS Not Enrolled/Supported
Spreedly falls back to standard transaction processing and submits the payment.
Redirects
The Spreedly Javascript will redirect the customer to an offsite page that is produced by the issuer and is then redirected back to the merchant’s site to complete the order (using the redirect_url). In the event that a transaction is not immediately successful, your application should still handle callbacks in order to be updated if the customer leaves the checkout form. See 3DS2 Callbacks for more details.
Troubleshooting
- For security reasons you should never make api requests from your frontend application directly to Spreedly. For this reason the authorize/purchase and complete transaction requests need to be made from your backend application.
- Ensure that the Spreedly Javascript library has loaded properly. You can do so by looking at your browser developer tools and looking at the network traffic.
- Ensure that your data in the purchase and completion requests is being passed to the Javascript library correctly.
console.dirthe object that you’re passing to the javascript library right after the purchase request (beforelifecycle.start()) and beforeevent.finalize. - Ensure that you’re collecting the accept header from your server side rendered page correctly (
console.log). It might be best to inject the accept header as a hidden form field and grab it with javascript. - Ensure that the ordering of interactions with the Spreedly Javascript library are correct. Create a function to listen to events, then register that event handler with Spreedly and issue your purchase request (with browser info). Finally, issue start on the lifecycle object you’ve created.
- You can also check where things are at by doing a
console.diron the event object in the statusUpdate event handler. - If all else fails, please reach out! Contact us at support@spreedly.com - we’d love to help.
Want to learn more about 3DS2?
You can read more about the regulations behind these changes on our blog or see the full specification details at the source, EMVco.
FAQs
See a list of all 3DS frequently asked questions in the Help Center.